
Release: V1.9
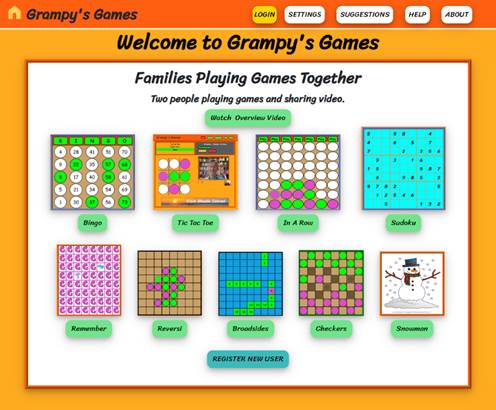
Welcome to Grampy’s Games. The goal of this website is to provide people with the ability to spend time together while playing games online. The games themselves will have a game board on one side and a video of the other person on the other side so that people are interacting while playing games.
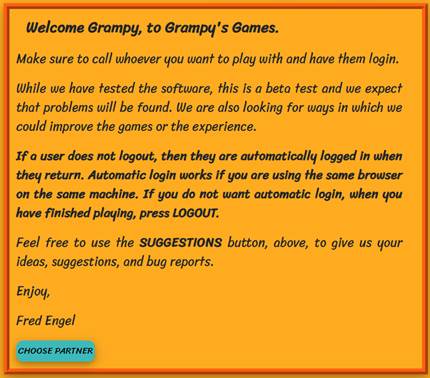
This is Version 1 of the games. If you have any suggestions, click the ‘Suggestions’ button above, and enter your suggestions, comments, criticisms, and recommendations. We welcome and seek your input!
Flow
of selecting game to play
Adding
and Modifying Users Accounts
Introduction
The basic flow of Grampy’s Games is to log into an account within a Community, choose a person to play with, choose the game to play, and then play that game. The two players are free to play as many games as they like, and they can also switch between the different games to play. At any time, they can switch to play with another Community member. During games, each player can see the other player in a video on the screen.
Communities are the organizing point for players. Each plyer is part of one community. For many of you, your Community will be your family name, but it need not be. One person creates a Community and the accounts inside the community. The person creating the Community becomes its Administrator. Community names need to be unique within Grampy’s Games. User accounts are created inside the Communities and need to be unique only within the Community. For example, if there is a Community named Jones and another named Smith, each community can have a Sally account. The Community makes the login process a little different, as you always need to add the Community name, as well as the username and the password. You may have to remind your Community members to enter their Community Name when they have trouble logging in.
To create a new community and account click on the ![]() button on the Welcome or Login pages.
button on the Welcome or Login pages.
Games are two player games. The screen will have a video image on one side, and the game board on the other side. There are a variety of options for the games.
The games are free, and you can play as long as you want. We hope to make this site free forever, but that will probably depend on other ways of raising money to pay for the systems. For now, everything is totally free.
Please send all comments, suggestions, and questions to: fred@grampysgames.com, or click on the SUGGESTIONS button above.
Overview
Overview Video:

Creating Accounts
Grampy’s Games revolves around the concept of Communities (e.g. family name, neighborhood).
1.
Someone creates
Community, accounts and lets the others know how to log on.
a.
Create a Community
b.
Create an Admin
Account (email address, and secure password)
c.
Create one or
more accounts for the other Community members who will play. (simple names and
simple passwords)
d.
Pass the
account information to the other members (e.g., the kids, friends), so they can
logon to play with you or each other
e.
Login and play
games between any two members of the Community
f.
Jump into the
game
2.
Players can
change their own passwords, or you, as the administrator, can change them if
they have forgotten them.
Playing
Assuming both you and the other player have logged on and are in the playing screen:
1.
Games start in the Game Choice screen.
2.
You should have
a video connection to the other payer, so you can
communicate easily. Sometimes, the
browser needs to be told to allow the video link to start.
3.
Each player
clicks on the game what they want to play, and the other person sees their
selection.
4.
When one player
clicks on the “Start” key, they agree with the other person’s game selection.
5.
Most games have
a piece that moves around the board. Its
color can be changed before the game is started, or
after each game is played.
6.
Some games, allow for the change of the board size. For example, the Remember Game works on a 3x3
board all the way up to a 9x9 board.
Older kids to do really well
on the bigger board. Older people do
well on the smaller boards, so kids love the bigger board.
7.
Games can be
restarted at any time, you can also change the game at
any time.
8.
If games are
played through to a tie or a win, the next game can be started, and the first
play will alternate when the new game is started.
Playing Games
Game tutorials
Each game has a short tutorial to explain the game. Here are the links to those tutorials:
· Bingo
· Checkers
· In A Row
· Remember
· Reversi
· Snowman
· Sudoku
Welcome Page
The first thing you need to do is to type the URL to a browser. The URL is http://grampysgames.com/ and would look as follows in Chrome:

When the connection has been made, the browser should display the Welcome Page. If you have previously logged on and played games, Grampy’s Games will try to log you on automatically and place you in the game decision screen with your previous partner. This only works if you're using the same machine in the same browser as when you were previously playing games.
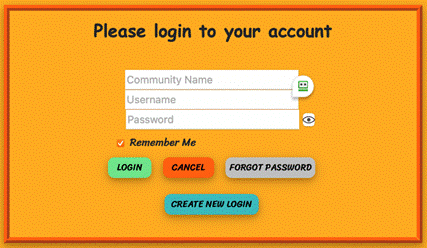
If you are not automatically logged in, you'll see the screen below. There are two different things that can be done on this screen. You can jump to the Login Page, or you can click on “CREATE NEW LOGIN”, to create a new community. The creation of Communities will be in the Administrator section below.
On every screen in the top right-hand part of the screen will be three buttons:
![]() - Go to the Login Page
- Go to the Login Page
![]() - Add/Delete Community accounts.
Change names and/or passwords
- Add/Delete Community accounts.
Change names and/or passwords
![]() - send suggestions, bugs, comments to Grampy’s
Games
- send suggestions, bugs, comments to Grampy’s
Games
![]() - Jump to this Help Document.
- Jump to this Help Document.
![]() - Information about Grampy’s Games
- Information about Grampy’s Games
![]() -
Create a new login and community
-
Create a new login and community
The light green buttons on the home screen each link to a tutorial video.
Creating accounts
On the Welcome and Login pages the ![]() will lead you to the account creation
wizard. The software will take you
through a five-step process to create an account, a password, a nickname, and a
name for your community. Once your
account is created, you will have the option of adding accounts for all the
players you anticipate playing games with.
will lead you to the account creation
wizard. The software will take you
through a five-step process to create an account, a password, a nickname, and a
name for your community. Once your
account is created, you will have the option of adding accounts for all the
players you anticipate playing games with.
Login
When you are in the Login Page, you can use your Community Name, Username, and Password to login. Please remember to enter your Community name when logging in.
Landing Page
Once logged in you will be in the Landing Page. From there you can move forward to pick a playing partner, logout, or change your password. If you are the Administrator for the Community, you will also be able to add users, delete users, and change their nicknames and passwords.
Creating member accounts
If you have just created your Permanent Account you will land on the create accounts wizard, allowing you to add users to your community. It's only jumped to automatically after the first creation of a Permanent Accounts community.
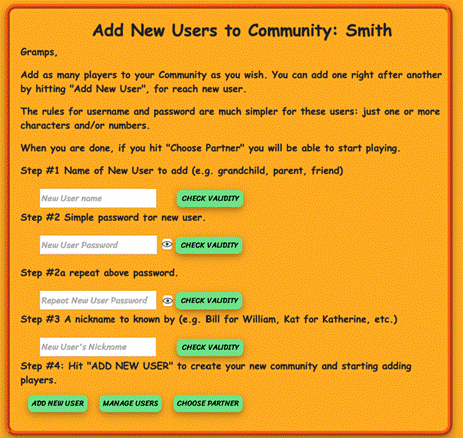
In this example we have a community called Smith. To add users, you provide the information and click on Add New User to create more accounts. You can add as many users as you need. If you change the accounts you created, click on SETTINGS and you will have more ability to modify what you are entering (see below).
Choosing a Partner
Before logging onto the system, you need to call or coordinate with the person you want to play with, so they log onto Grampy’s Games. If you are using Just Play, when the other person logs into the system, you will both be placed directly into a game. If you are using Permanent Accounts, you will need to find another logged in user of your Community to play with. Choose Partner will put you into the partner selection screen and show you all the users that are logged in and ready to play.
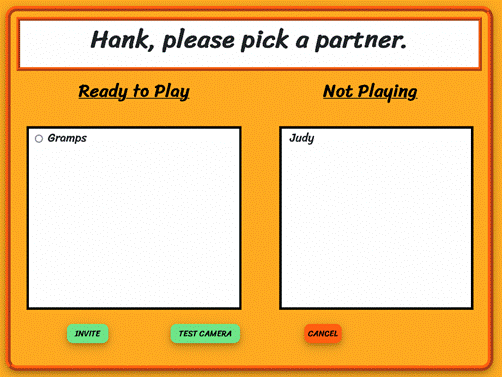
There are two columns:
1. Ready to Play
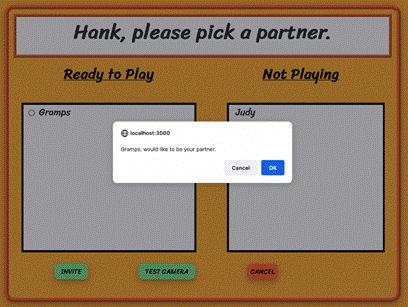
This column has all the logged-on players in your Community. If the player is active, they show up as above. If they are playing a game, there is a “(p)” after their name. Players available to play can be chosen by clicking on the “o” in front of their name (Gramps, in the above example). By selecting the name and then clicking on invite you are letting them know you want to play with any of them.
The chosen player will get a pop-up message letting them know you want to play. If they click OK, you will progress to the Games screen. If they decline your invitation, you will be notified and remain in the Partners screen and can choose another player.
2. Offline Players
The players in this list are part of the Community and are not logged onto Grampy’s Games.
The CANCEL button returns you to the landing page.
3. Test Camera
The ![]() button allows you to see if the browser can
acquire the camera, microphone, and speakers.
This can all be done before entering the game. Sometimes, the browser settings are
restrictive and need to be set to allow the application to grab the camera,
microphone, and speakers.
button allows you to see if the browser can
acquire the camera, microphone, and speakers.
This can all be done before entering the game. Sometimes, the browser settings are
restrictive and need to be set to allow the application to grab the camera,
microphone, and speakers.
Selecting Games
Once you and a partner have agreed to play a game, you will land on the GAMES page. The top left provides you with information about the game, whose turn it is and what the score might be. The top right, allows you to make various game choices: changing color, changing the board size, changing games, restarting the game, and leaving the game.
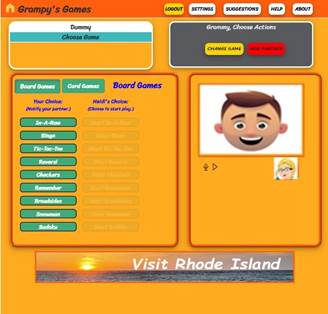
The bottom of the page has two main parts. Choosing what to play, and the video.:
1. Selecting game type:
The Board Games and Card Games are
in different views, select the game type: 
2. Choosing what to play:
a) Your Choice:
These are the games that are available to play. When you click on anyone of those games, your partner will see your selection under the second column. You can change your mind and click on any other game you want to play. Your partner will see these changes.
b) Partner’s Choice
The second column is what your partner has selected as their game choice. In this example, the partner is named Heidi, and so it would show her choice. Games start by clicking the dark green button in the second column. It can be pressed by either player.
3. Video and audio:
Video and audio will be that of your
partner. Many browsers will ask
permission to connect to the camera and microphone. Please “allow” that connection so that your
partner can see you and talk to you.
Each browser will have their own ways of asking those questions.
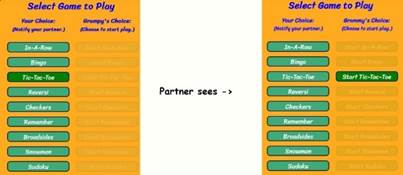
Flow of selecting game to play
1. Pick a game under Your Choice. In the example below, User 1 chooses Tic Tac Toe. User 2 gets to see the choice.
User 1 User 2
User 2 will see the selection, as
shown. If User 2 clicks on a different
game button, User 2 will see their selection.
Once you have agreed on which game to play, either user clicks on the
right-hand button with the word ‘Start’ in it.
This will move you both into the game you have agreed to play. You can choose games as often as you like, as
can your partner. It is only when the someone’s choice is selected, by either of you, that you
will jump into the game. That is, when either one of you agrees with your partners choice, you both enter the game and can start
playing.
Playing Games
The game screen has 4 distinct parts:
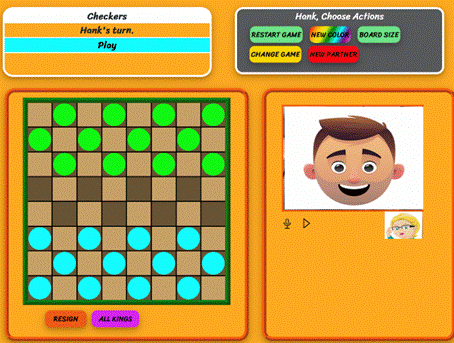
1.
The game status
and action (top left)
2.
Choose Actions,
for various menu options (top right)
3.
The game board
(bottom left)
4.
The video image
of the partner (bottom right)
a.
Audio Mute/
Video Pause - ![]()
Choose Actions
The menus in Choose Actions provide various actions to be taken. These menus will change when the game is being played.
1. The items below are available in all games
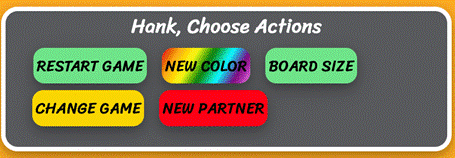
a. RESTART GAME
This menu can be pressed at any time by either player to end the current game and start the game over. The first player to change only changes if a game is played to completion. Whoever went first will go first again.
b. New Color
In each of the games, each player will have a color of their own. The players are free to choose whatever color they want. When this menu is chosen, the following will appear:
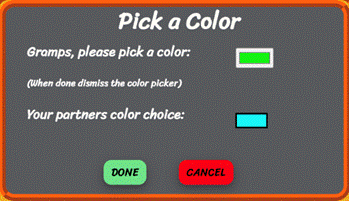
The top part shows the current player’s color. The bottom part shows the partner’s color. If both players are choosing new colors simultaneously, they will each see the others choice. Obviously, if they pick the same color as the other player, the game will be hard to play. To choose a new color, the top color needs to be clicked on. (In this example, the green should be selected). This clicking on the color will cause a “color picker” to appear. The exact format and behavior of the color picker will vary with the operating system. Below, is an example from Foxfire on the Mac:
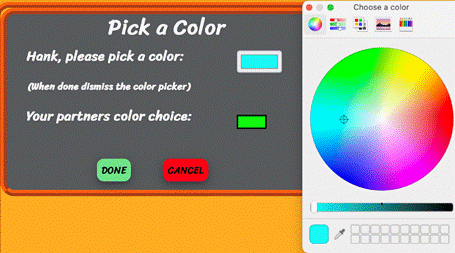
Different browsers and different devices will have different color pickers
c. Change Game
If you would like to leave this game and play another game with this partner, click on the Change Game button. This will end the current game and transport you back into the Choose Game screen. Your partner will receive a pop-up that tells them of your actions, and then they will also be moved to the Choose Game screen. At present, if you select a game to play before your partner has moved into the Choose Game screen, it may not register with that screen, so you may have to repeat clicking on that choice.
2. Tic Tac Toe & Remember
These two games have one additional option. Usually, Tic Tac Toe is a game of 3 rows and 3 columns. That is the default setting. For Remember the default setting is 8 columns and 8 rows.
When the Change Board Size is selected, the following is displayed:
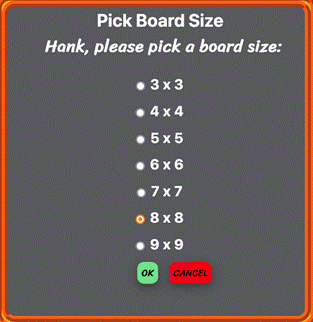
You can choose to play a different size game by choosing one of those options. When you click OK both your board and your partners board will reflect the game chosen.
Playing Board
Each of the games has its own playing board.
1. In A Row
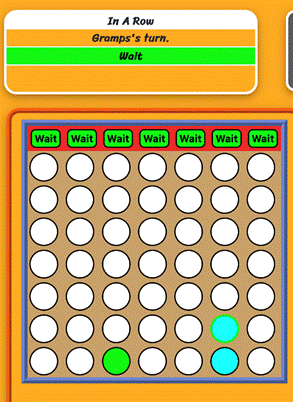
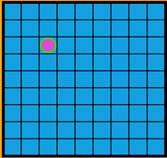
The objective this game is to get 4 of the same-colored circles in a row, horizontally, vertically, or diagonally. There is only one winner. Play alternates between players and each time the game will determine if there was a winner. Plays are final and cannot be undone.
The first image, below, shows the screen for the player whose
turn it is. The player selects the column and then hits PLAY. Notice it names whose turn it is as well as
telling you to play or wait. The game
will only allow legal moves and will indicate when the
game is over. Note that the circle on the bottom left has a green border
round the blue interior. This is used to
indicate the location of the previous move. The color of the person with the
current move will be the border, while the body of the circle will be the color
of the person who made that move. On the next play, that border will become
black, and the newest move will have this combination. This can be seen in the
image on the right.
For a tutorial on In A Row, see: 4 In A Row Tutorial

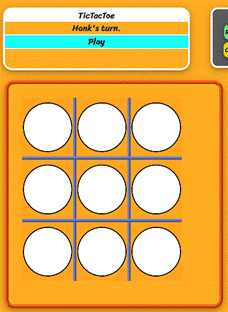
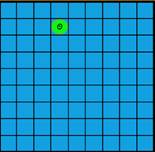
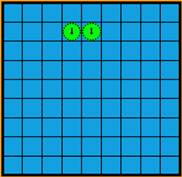
2. Tic Tac Toe
The objective of Tic Tac Toe is to be the first person to get 3 squares in a row of the same color. Play proceeds back and forth between players. Here you simply click on the chosen location. The panel will tell you if it is your turn to play or wait. The game will only allow legal moves and will indicate when the game is over. You can play 3x3, 4x4, 5x5, 6x6, 7x7, and 8x8 Tic Tac Toe games.
3. Reversi For a tutorial on Reversi strategies
The goal of this game is to have the greatest number of tokens with your color. Each turn allows the user to place a token in a position that leads to turning over tokens of the other color, leading to more tokens matching the newly placed token. Tokens that belong to the other player and are adjacent to the newly placed token will be flipped to the color of the new tokens. Token adjacent to those colors (in a straight line) will also be flipped if somewhere along the line there is a token of the same color at the newly placed token. Thus, all the tokens between the newly placed token and the first token of the same color will be flipped to the new color. There has to be at least one token of the other color in the line. The tokens changing color can be vertically, diagonally, and horizontally above, below or next to the newly placed tokens. The game ends when all the tokens have been played and the board is full of colored tokens.
This is a link to video instructions: Reversi Tutorial
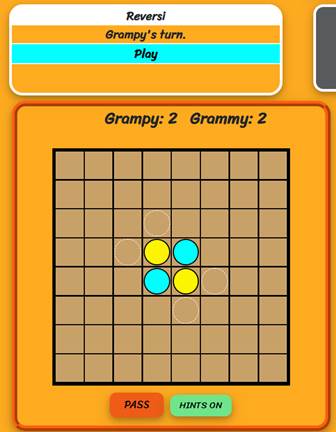
The goal of the game is to have more pieces of your color at the end of the game. One or more pieces change color on each play. A legal move is when you can add a piece to the board that causes one or more of the other user’s pieces to change color. All legal moves are shown as dashed circles. In a simple case, the moves below:
Initial board:  top left piece flipped from green to
blue.
top left piece flipped from green to
blue.
 next move flipped blue to green
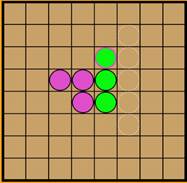
The two examples above are
horizontal and vertical changes. But the game can do diagnoal changes as
well. Below is a move that causes piece
to flip in diagonal, horizontal, and vertical, all in one move.
Before purple plays  Purple’s move
changes because of purple’s move 
The user clicks on the square of their choosing. As with the other games, the play is back and forth. The software will impose the rules and indicate legal and illegal moves. Note the PASS button on the bottom of the image below. In Reversi, it is sometimes the case when one player has no legal moves, and therefore must PASS the play to the other player. The game will only allow legal moves and will indicate when the game is over.
If there is no move for a player, then the player presses the ![]() , and the other user will take a
turn. The software will check that there
is no legal move and only allow a pass if there is no
move.
, and the other user will take a
turn. The software will check that there
is no legal move and only allow a pass if there is no
move.
The ![]() button turns hints on and off. When the word ON is visible, all legal moves
are shown with dashed circles. When the
word Off is visible, no such hints are provided. Each game starts with hints turned on.
button turns hints on and off. When the word ON is visible, all legal moves
are shown with dashed circles. When the
word Off is visible, no such hints are provided. Each game starts with hints turned on.
4. Checkers
The user clicks on the piece they want to move. The software will indicate the legal moves (see below). After the game indicates the legal moves, the player clicks on one of those squares. As with the other games, the play is back and forth. The software will impose the rules and indicate legal and illegal moves. Note that checkers rules state that jumps must be taken. If there is a multiple jump, the game will show that one at a time and impose the requirements that jumps be taken. As with all the other games, the last piece to move will have it border changed from black, to the other players color, so that it is easy to see which piece was moved.

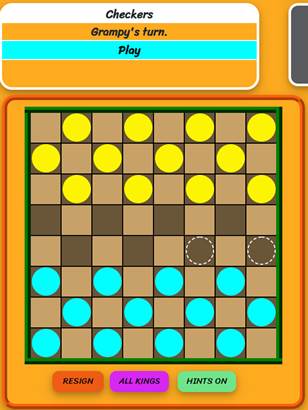
Initial Board Player clicked on piece to move
The ![]() button converts all pieces (on both sides) to
kings. When one player clicks on this
button, the other player gets asked if they agree to go to “All Kings”.
button converts all pieces (on both sides) to
kings. When one player clicks on this
button, the other player gets asked if they agree to go to “All Kings”.
The ![]() button turns hints on and off. When the word ON is visible, all legal moves
are shown with dashed circles (above right).
When the word Off is visible, no such hints are provided. Each game starts with hints turned on.
button turns hints on and off. When the word ON is visible, all legal moves
are shown with dashed circles (above right).
When the word Off is visible, no such hints are provided. Each game starts with hints turned on.
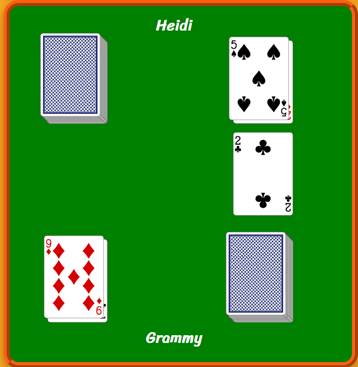
5. Remember
The objective of Remember is to find the most matching pairs of cards. The user clicks on the piece they want to flip over. The card is flipped over, the user then selects a second card. If the two flipped cards are a match, the user gets another turn. This user keeps going until they flip two cards that do not match. Play the moves to the other player.
As with the other games, the play is back and forth. The software will impose the rules and indicate legal and illegal moves. There is a slight delay after the second card is flipped, so people can remember where that card is located.
For a tutorial, see: Remember Tutorial


Play continues back and forth until all cards are flipped over.
You can play 3x3, 4x4, 5x5, 6x6, 7x7, 8x8, or 9x9 Remember games.
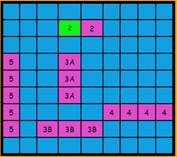
6. Broadsides
Broadsides is a game of guessing where the other player placed their boat pieces. Each side sets up the boats on the board and when ready clicks on Start Game. When both sides of have hit Start Games, play begins. Each player has two boards. The Shots board shows all the players shots they have taken. The Boats view shows all the players still un-sunk boats, and where still floating boat has been hit.
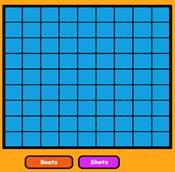
The initial board looks as follows:
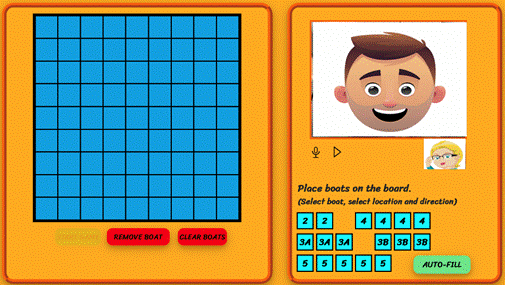
a. Boats to be placed:
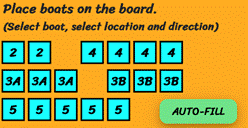
i. To place a board, click on a boat (2’s, 3A’s,
3B’s,4’s, or 5’s) and then click on the square on the blue board to anchor the
boat. Next, click on the direction you
want the boat to be in, and the boat will be placed. White dots indicate the legal directions from
that spot.
ii. To remove a boat from the blue board, click on the
boat, and the click on Remove Boats.
iii. You can also have the game place
the boats for you. Just click on Auto Fill Boats and the boats will be placed.
You can click multiple times to get a placement you like better. Boats that
have been auto-placed, can be removed manually and
placed in another spot.
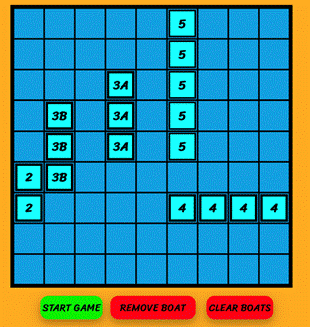
iv. A fully placed board looks as follows:
b. Playing the game
i. Play begins when both players have placed boats and
hit ![]()
ii. The ![]() button shows
the boats while the
button shows
the boats while the ![]() button shows the shots.
button shows the shots.
iii. The board looks as follows when it is ready for play
to begin:
1.
![]() screen
screen 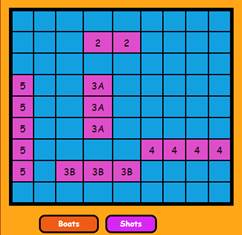
2.
![]() screen
screen
iv. In order to shoot, the player must click on the ![]() button and
click on any of the blue squares. If the
player misses, it will look as follows on their screen:
button and
click on any of the blue squares. If the
player misses, it will look as follows on their screen:
v. The other player will see the following screen after
a miss:

vi. After a hit, the following is what is seen by each
player:
1.
Shooter
2.
Boat owner
vii. When a boat is sunk, it is removed in the following
turn. The shooter will see the shots
with an indicator that the boat has sunk (down arrow):
1.
c.
Game ends when on side has lost all of their
boats.
7. Bingo
The objective of Bingo is to be the first person to have 5 pieces in a tow, vertically, horizontally, or diagonally. The software will display one number at a time, and the players either clicks on that number of clicks on PASS, if they do not have the number. When both players have played, the next number is displayed. The game proceeds until there is a turn where one or both players have achieved the goal.
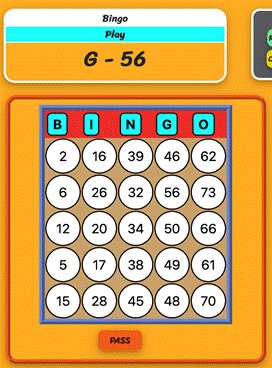
The game of Bingo has been modified slightly to accommodate the desired audience. The number in play is displayed on the screen, as shown above (see the number 10). There is no clock and play proceeds when both players have played. Each player either clicks on the number in their card or Pass, if they do not have that number. When both players have made their move, the next number id displayed. The game automatically determines if there is a winning card. If both players have a win on the same turn, it is considered a tie.
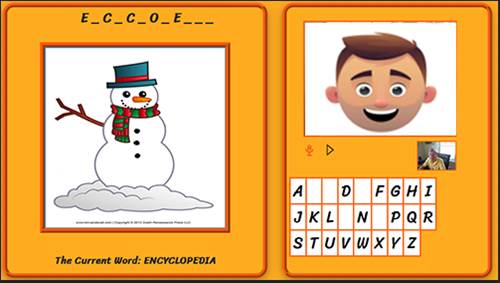
8. Snowman
Snowman is Hangman dressed in nicer clothing. One person picks a word of phrase, and the other person guesses at the answer. Each missed guess removes a piece of the snowman. When only the hat remains, the person guessing has lost. The person guessing alternates whether the guessing wash successful or not.

9. Sudoku For a tutorial on Sudoku strategies
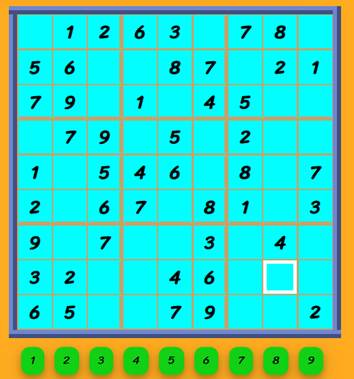
Sudoku is a puzzle game that we have made into a two-person game. This is a cooperative game, with no winners or losers. The objective of the game is to find the numbers that fill in all the blank cells in the initial board. The first step in the game is to choose the game level. Once that is chosen, each person gets to click on one number, and then the other person gets a turn.
The initial board is as below:
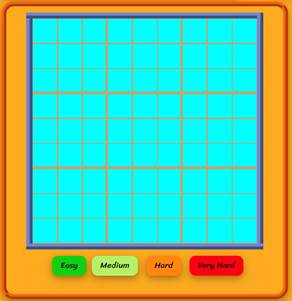
Either user can click on the buttons on the bottom, which selects the difficulty of the game to be played (Hard and Very Hard games can take 20-30 seconds to be created). Once the difficulty is chosen, the game board (fore Easy) is displayed as below:
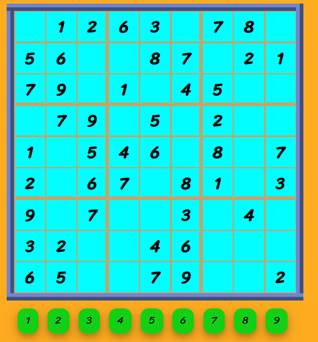
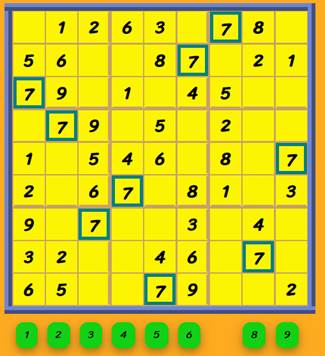
The objective is to find the right numbers to fill into each of the blank cells. To get a better look at the game, clicking on any of the cells with a number in them will display all the cells that have that number:
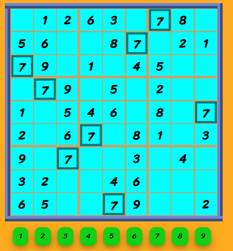
Once a cell is ready to be filled, the chosen cell must be selected (and highlighted):
Once a cell is selected, the desired number is clicked on (7 in this example):
Once a number is selected, it becomes the other persons turn. Note also that the 7 is no longer displayed in the numbers at the bottom. That’s because all the 7’s on the board have been found.
Sometimes, it is impossible to know what number should be
filled into a cell. In these situations,
adding notes to the cell allows for the best knowledge on what might be there
to be recorded. Pressing on the ![]() will allow entries to be notes, and not formal
plays.
will allow entries to be notes, and not formal
plays.

When in notes mode, the button changes to ![]() . Pressing on it will allow real answers to be
entered into the cells. When the game in in Notes mode, entries will look as follows:
. Pressing on it will allow real answers to be
entered into the cells. When the game in in Notes mode, entries will look as follows:
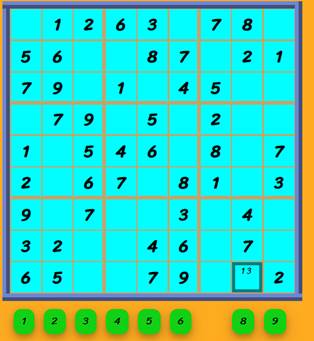
In the board above, two guesses have been entered at the bottom of the board (1 and 3). The game stays in notes modes until someone places it back in answer mode. When the answer is placed in another cell that would cause the notes to be invalid, that number is removed from all the notes cells that are affected.
10. War
The card game War is available under the CARD GAMES selection. The only activity is to click on your own card deck to cause a card to be selected. Cards are automatically place in discard pile and retrieved and shuffled when the deck is empty. Below is a sample board:
Hints in playing games
1.
For the time
being, if things look a little strange, or you are both in WAIT state, just hit
the refresh button and it should get rid of that issue.
2.
The video in
the game works when choosing games and when playing games. You will need to make sure your browser is
allowed to use the camera and microphone.
Some browsers ask if it is OK to use the camera and microphone, others
do so on their own. A search of Google
with “configuring the camera on XXX browser” (with XXX being replaced by your
browser (e.g. Firefox, Edge, Opera, Chrome, Safari) will show you how to get
the camera permissions. When switching
from choosing a game to playing a game, you may need to give the browser
permission, again, to use the camera and microphone.
3.
The software
has been tested in iPhones and iPads. When playing on these devices the camera and
microphone only work when using Safari.
This is an Apple imposed limitation.
4.
If you have a
computer with a low-resolution screen, you may not initially see the entire
game on the screen. If you move the
sides of the browser to make it narrower, you should be able to see the whole
game.
5.
The game is
meant to be played where each player is on their own computer. If you do choose
to use one computer for both players, then each player needs to be on a
different browser (e.g., Firefox, Chrome, etc.)
6.
During testing
of this software, we sometimes found the two players where
somehow out of sync. While we think we
fixed all those cases, if you think they are out of sync, use the reload button
on your browser to refresh the screen.
This should overcome any items that are out of sync.
7.
The video
software may freeze if there is little motion on the screen, which is
normal. Moving in front of the camera
will revive it and make the video sold again.
We know of no instances where this video freeze is permanent.
8.
Sometimes, when
the video is initiated, the screen is split so the left half of the image shows
up on the right side of the screen and the right side on the left. This happens when the other player’s browser
initializes incorrectly. Hitting reload
on the OTHER BROWSER will usually cause this to be corrected.
9.
If the screen
somehow does not look right, try resizing the heigh, width or both.
10.
There is a
known bug (that I cannot recreate) where both people in the game are told to
wait. If that happens, click on Start
a new game.
11.
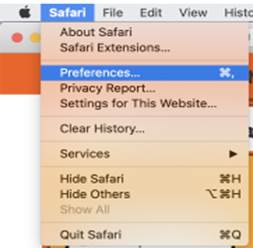
Sometimes
Safari will not allow a website to use the camera and/or microphone unless
explicitly told to. Here is how you do
that:
a.
Select
Preferences:
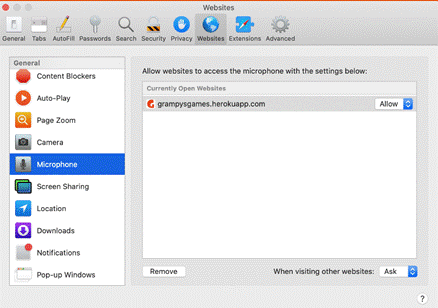
b.
Select Camera
and Microphone each and “allow” access:
Administration
There are several administrative screens, for both users and Community Admins.
Change Password
Any user can change their own password from the landing page. Simply click on “Settings” and you will see the following:
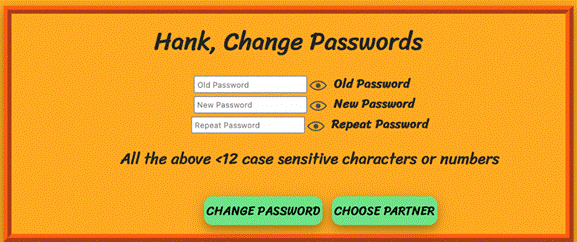
Simply enter your old password, followed by the new password
twice. If you do not remember your old
password, contact the Community Admin who will be able to give you a new
password. Note the ![]() icon will allow you to see the text of the
password.
icon will allow you to see the text of the
password.
Adding Users Accounts
In order to play games, you will need to add one or more users to play with. When you have successfully created your community, you will be moved to the Add User Wizard. It will help you add the users to your Community.

1. Add New User
Clicking on this button we create the user defined in the fields above it. You will get a message to the success or failure of that attempt. After a success, you will stay on this page so you can add other users, if you wish.
2. Manage Users
Clicking on this button we create the user defined in the fields above it. You will get a message to the success or failure of that attempt. After a success, you will stay on this page so you can add other users, if you wish. This screen is described below in the “Adding and Modifying Users Accounts” section.
3. Choose Partners
Clicking on this button will cause you to move to the “Choose Partner” screen so you can find a partner and start playing games.
As you can see below, you will be able to add, delete, and modify the user accounts later as well. When you land on the landing page, you can move to the page below.
Clicking on the ![]() button will cause the system to check the
correctness of all the entries and provide guidance.
button will cause the system to check the
correctness of all the entries and provide guidance.
Adding and Modifying Users Accounts
After logging in, Administrators can choose to add to or otherwise modify the Community they are the Admin for. Click on Settings to go to the following screen:
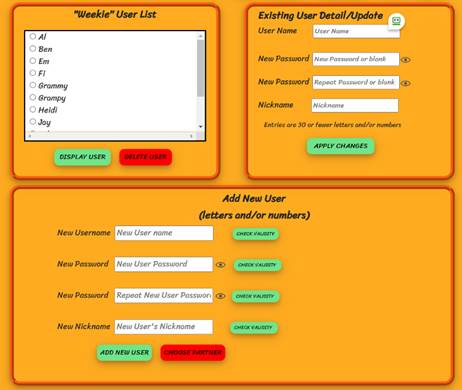
4. User List
This is a list of all the users in your Community. You can select a single user and then click on Display User or on Delete User. When selecting the Display User, the user’s detail is displayed in the User Detail part of the screen (bottom left). Passwords are not displayed but can be changed. If you have deleted a user you did not intend to delete, simply use Add New User to create that user again.
5. Add New User
Enter the username, passwords and Nick Name for the new user. Both the Username and the Nick Names need to be unique within the community. All of the fields are case sensitive and need to be less than 12 characters or numbers. The rules for passwords for community members are made simpler so that small children will be able to remember their passwords.
6. Display User
Once you have clicked on Display User in the User List, for an individual user, their Username and Nick Names are displayed in the User Detail part of the screen. Simply make the changes you need to make and then click on Apply Changes.
7. Choose Partners
Go find someone to play with on the Choose Partner screen
Deleting Accounts
If you want your account deleted, and your email address forgotten, send an email to info@grampysgames.com requesting that deletion. Send the email from the email in the account, so that we have verification of the request’s authorization.
Comments and Bugs
This release is the first beta test of this software. We are looking for what you like and do not like. We also assume you will encounter some bugs. We want to hear about them. When reporting a bug, try to provide as much information as possible before the bug, it would be really helpful in trying to recreate the problem you encountered.
Please send all suggestions to: fred@grampysgames.com